RT5350F-OLinuXino
RT5350F-OLinuXino default images instructions
Overview
Prebuilt files and system restore
RT5350F-OLinuXino comes with an image loaded into the SPI flash memory. If something goes wrong you can restore the original image.
Two of the prebuilt files (bootloader.img and openwrt.bin) can be uploaded via the built-in uboot. If your uboot is broken you might need a programmer to recover the software of the board. The other two files (that contain uboot) require a programming tool (uboot+factory.bin and uboot+factory+openwrt.bin). The board comes programmed with the image called uboot+factory+openwrt.bin. See #Upload prebuilt image using uboot or #Upload image using programmer.
All prebuilt binary files are available for download at our GitHub page. Direct link to the location: https://github.com/OLIMEX/OLINUXINO/tree/master/SOFTWARE/RT5350F/Prebuilt%20images
The four prebuilt files available are:
- bootloader.img - this is only the bootloader
- openwrt.bin - this is only prebuilt openwrt
The above two can be uploaded using uboot.
- uboot+factory.bin - this is the uboot + factory wifi settings
- uboot+factory+openwrt.bin - this is the uboot + factory wifi settings + openwrt
These two binaries can be uploaded only with flashrom (and a programmer hardware).
Upload prebuilt image using uboot
Reboot the board and you'll see:
 U-Boot 1.1.3 (Apr 20 2015 - 13:25:55)

 Board: RT5350F-OLinuXino DRAM:  32 MB
 relocate_code Pointer at: 81fb4000
 spi_wait_nsec: 42
 spi device id: 1c 30 17 1c 30 (30171c30)
 find flash: EN25Q64
 raspi_read: from:30000 len:1000
 .*** Warning - bad CRC, using default environment

 =============================================================
 RT5350F-OLinuXino UBoot Version: 4.0.0.0
 --------------------------------------------------------------
 ASIC 5350_MP (Port5<->None)
 DRAM_CONF_FROM: Boot-Strapping
 DRAM_TYPE: SDRAM
 DRAM_SIZE: 256 Mbits
 DRAM_WIDTH: 16 bits
 DRAM_TOTAL_WIDTH: 16 bits
 TOTAL_MEMORY_SIZE: 32 MBytes
 Flash component: SPI Flash
 Date:Apr 20 2015  Time:13:25:55
 ============================================
 icache: sets:256, ways:4, linesz:32 ,total:32768
 dcache: sets:128, ways:4, linesz:32 ,total:16384
  ##### The CPU freq = 360 MHZ ####
  estimate memory size =32 Mbytes
 Please choose the operation:
    1: Load system code to SDRAM via TFTP.
    2: Load system code then write to Flash via TFTP.
    3: Boot system code via Flash (default).
    4: Entr boot command line interface.
    7: Load Boot Loader code then write to Flash via Serial.
    9: Load Boot Loader code then write to Flash via TFTP.
Upload prebuilt OpenWRT using uboot
Press 2, then y and enter some values for ip, server ip and filename:
 You choosed 2


 2: System Load Linux Kernel then write to Flash via TFTP.
  Warning!! Erase Linux in Flash then burn new one. Are you sure?(Y/N)
  Please Input new ones /or Ctrl-C to discard
         Input device IP (10.10.10.123) ==:10.10.10.123
         Input server IP (10.10.10.3) ==:10.10.10.3
         Input Linux Kernel filename () ==:file.bin
Then your new system will boot.
Upload prebuilt uboot
Press 9, then again enter ip address, server ip and filename to upload:
 You choosed 9

  0
 raspi_read: from:40028 len:6
 .

 9: System Load Boot Loader then write to Flash via TFTP.
  Warning!! Erase Boot Loader in Flash then burn new one. Are you sure?(Y/N)
Press Y and continue:
Input device IP (10.10.10.123) ==:10.10.10.123
Enter some static address for the device, for example 192.168.0.201.
Next enter server address, for example 192.168.0.15:
Input server IP (10.10.10.3) ==:192.168.0.15
Finally enter filename:
Input Uboot filename () ==:bootloader.img
Don't forget to plug LAN cable. You should see something like that:
 Got it
 #####################
 done
 Bytes transferred = 106976 (1a1e0 hex)
 NetBootFileXferSize= 0001a1e0
 raspi_erase_write: offs:0, count:1a1e0
 raspi_erase: offs:0 len:10000
 .
 raspi_write: to:0 len:10000
 .
 raspi_read: from:0 len:10000
 .raspi_read: from:10000 len:10000
 .raspi_erase: offs:10000 len:10000
 .
 raspi_write: to:10000 len:10000
 .
 raspi_read: from:10000 len:10000
 .Done!
Upload prebuilt images using programmer
We will use ARM-USB-OCD. It has FT2232 chip which can be used to in SPI master mode. You can also use ARM-USB-TINY; ARM-USB-TINY-H; ARM-USB-OCD-H or any FT2232-based debugger.
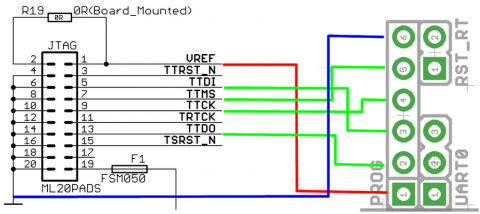
Connect ARM-USB-OCD with RT5350F-EVB according the schematic below:
RST_RT jumper MUST be closed. Then power the board to become ready writing.
Download flashrom software and build it using instructions on the site.
To program the SPI flash run:
flashrom -p ft2232_spi:type=arm-usb-ocd -w file.bin
Then wait some minutes for process to complete.
Building uboot
Get the sources from:
 git clone https://github.com/OLIMEX/u-boot_RT5350F-OLinuXino
 cd u-boot_RT5350F-OLinuXino
Target must be build with gcc3.4! This is very important because with another versions of GCC the build process will fail. You can find that version from Ralink SDK. Use Google to find it.
Run
make menuconfig
You'll see that the default location is /opt/buildroot-gcc342/bin. Change that with your path.
To actually build u-boot run:
make
At the end of the process you'll see something like this
 ===============<<IMPORTANT>>==================
 Notes:Uboot firmware in flash is uboot.img NOT uboot.bin
 ================================================

 ./tools/mkimage -A mips -T standalone -C none \
         -a 0x80200000 -e 0x80200000 \
         -n "SPI Flash Image" \
         -r SDR -s 16 -t 32 -u 16 \
         -y 0x0 -z 0x0 -w 0xFF -d uboot.bin uboot.img
 Image Name:   SPI Flash Image
 Created:      Thu May 14 08:23:19 2015
 Image Type:   MIPS Linux Standalone Program (uncompressed)
 Data Size:    106912 Bytes = 104.41 kB = 0.10 MB
 Load Address: 0x80200000
 Entry Point:  0x80200000
 DRAM Parameter: 6 (Parm0=0 Parm1=0)
The image uboot.img can be uploaded via tftp.
Building OpenWRT
Make a directory:
 # mkdir some_dir
 # cd some_dir
Download sources:
# git clone https://github.com/OLIMEX/openwrt -b rt5350f
Go into openwrt directory:
# cd openwrt
You can use our config:
# make
or if you want to change something:
# make menuconfig
# make
After some time build will finish. The image is found under:
 build_dir/target-mipsel_24kec+dsp_uClibc-0.9.33.2/linux-ramips_rt305x/\
 openwrt-ramips-rt305x-olinuxino-rt5350f-squashfs-sysupgrade.bin
Place that file on some tftp server and then upload it to the board.
Demo projects
- First steps video with RT5350F-OLinuXino-EVB by Leon Anavi: https://www.youtube.com/watch?v=-MsywWtN79c


